This post is part of a series that begins with BDSM Encounters – A Framework.
Compression Injuries – Nerves and Circulation
There are a number of common rope-related risks. One of the most important to understand is how the pressure of rope on the body — or the positions that a body might be held in during a tie — can impact and even damage nerves and blood vessels.
Nerve damage is insidious. It can happen almost instantly or can build gradually over time, with multiple small injuries building to something more serious. It can take months to heal, or years, or it may never fully heal. Therefore, it is important that everyone involved recognize that this risk is always present, and that even if both Top and bottom do what they can to reduce the risk, nerve injury may still occur.
Both Tops and bottoms need to learn as much as they can about:
- The various types of nerve injuries possible during rope bondage.
- How best to mitigate the risks.
- How to recognize when something is wrong.
- How to respond to issues and injuries, should they occur.
It’s also important that bottoms learn as much as they can about their own bodies and capabilities so they can help Tops understand how to tie them in ways that meet the bottoms’ specific needs while reducing the risk to a level that both are comfortable assuming.
The Brain
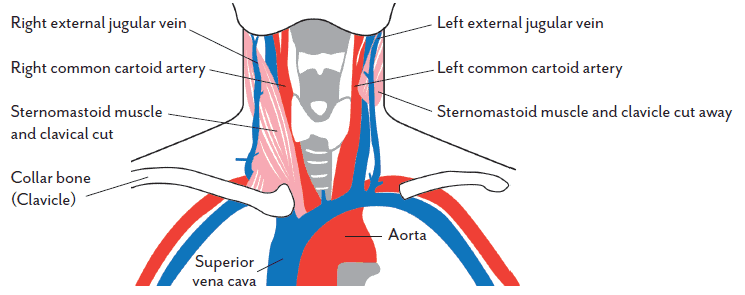
One very important (and hopefully obvious) thing: never cut off the flow of blood to the brain. Never put pressure across the front of the neck for any length of time. The carotid arteries and jugular veins that run through the front of the neck are sensitive; messing with them is highly risky.
Yes, erotic choking is something that some people do, but it is highly risky edge play. Using rope to do so adds even more danger to an already dangerous activity. There is nuance here, but choking is beyond the scope of what we will discuss here.
Flow of Blood Through the Front of the Neck
Elsewhere
In other parts of the body, circulation loss over a short period of time isn’t generally a major concern. However, you should keep an eye on any changes to the color of the skin. When tied in such a way that blood flow is being impacted, the skin may change color (or may not; each body is different):
- If the skin becomes darker (a shade of red, even dark red or purple): This is common in rope bondage and is not usually a concern over short periods of time (30 minutes) unless there is a complicating medical factor (like pre-existing circulation issues, e.g. diabetes, peripheral vascular disease, Raynaud’s syndrome, etc.). See “Exceptional Circumstances” below for important information on exceptions and complicating factors. Getting darker means that blood is collecting in that location because it is not able to flow out as easily as it normally does (impaired venous return).
- If the skin becomes paler: This can mean that blood is not able to flow into the area like it should (impaired arterial flow). This is a much more serious situation and should be addressed immediately, see “Exceptional Circumstances” below. This is less common, however, because arteries normally run more deeply in the body and are not compressed as easily.
While there is not normally a lot of risk if a limb is without circulation for 30 minutes or more, in the bondage world, most people want to limit risk as much as they can and will not allow blood flow to remain restricted for more than 15 to 20 minutes. They will also often take immediate steps to improve circulation by dressing ropes, moving wraps, or changing positions. In some cases, circulation loss for a period of time is unavoidable, but keep it to that reasonable time limit.
Regularly Test for Restricted Blood Flow
- Check your partner’s skin color and temperature before and during the scene. Know what is normal for your partner, so you can tell what is not normal.
- If the skin goes paler, adjust the bondage to loosen the restriction to that area.
Exceptional Circumstances that Carry Higher Risk
There are a variety of circumstances where impaired blood flow is a higher risk for a specific individual. Any condition that includes blood issues, blood clotting or circulation issues, e.g. anemia, diabetes, thrombophilia, heart issues, peripheral vascular disease, Raynaud’s syndrome, etc.
While we use the limit of 30 minutes as the normal guidance, what if things go beyond that?
What if you come across a situation where an uneducated sub tried to tie themselves up, but was unable to escape and got themselves stuck in a situation where they had severely impaired blood flow for hours?
Lower Risk (typically):
- Time: Less than 30 minutes
- Medical History: No history of any blood or circulation issues
- Sensation: Slight numbness/tingling
- Discoloration: No change or mild to moderately darker
- Commonly Recommended Actions: Slowly relax the tie. The tighter it was or the longer it was on, the more slowly you need to go. Then release the rope. Preferably drink sports drink or other high sugar drink (be careful of this if they are diabetic) or water.
Take special precautions when engaging in activities with higher risk
Before you being any activity that may carry higher risk, be certain that you:
- Have confirmed that all participants fully and clearly understand the risks and are willing to accept them.
- Have plans in place for the reasonably expectable risks and that all parties know those plans.
- Have a means for emergency release (EMT shears, etc.),
- Have verified that you know how to connect with emergency services in your area (911, 112, 999, etc, depending on the country you are in), and…
- Have the means to do so (a fully charged phone with a good signal).
Moderate Risk: Any one of these … the longer or more intense, the greater the risk
- Time: More than 30 minutes, less than 4 hours*, but the longer the tie was on, the greater the risk; many consider 3 hours to be crossing into high risk.
- Medical History: Any condition that includes blood or circulation issues, e.g. anemia, diabetes, heart issues, peripheral vascular disease, Raynaud’s syndrome, etc.
- Sensation: Numbness, loss of control, cold to the touch
- Discoloration: Pale (impaired blood flow into the area), deep purple (impaired blood flow out of the area)
- Commonly Recommended Actions: Relax the tie very slowly & drink lots of fluids – ideally sports drinks/high-sugar drinks (be careful if they are diabetic), otherwise water. Fluids help the liver remove toxins from the blood; a blocked vascular pathway will accumulate waste products (toxins) over time. By drinking water and releasing the tie slowly, you cushion the impact on your system and liver, hopefully reducing the risk of complications. As always, this is not medical advice, I am not a doctor; if unsure, contact a licensed medical professional.
High Risk: Any one the below or two or more items in “More Risk” above
- Time: 4 hours* or more (although some people use a lower threshold, 3 hours, for example)
- Medical History: More than one condition that includes blood or circulation issues. Or any condition that creates increased risk of forming blood clots in the veins, thrombophilia, for example. << We do not recommend tight binding a person that has a history of such conditions.
- Sensation: No sensation, loss of control, cold or hot to the touch
- Discoloration: Extremely pale (there is a risk of severe ischemia, insufficient blood flow into the area, which can cause serious problems), very deep purple or black (it may be that there are blood clots forming)
- Commonly Recommended Actions:Do not attempt to deal with a high-risk situation on your own. SEEK EMERGENCY MEDICAL ATTENTION IMMEDIATELY.CRITICAL: DO NOT UNTIE THEM. Let the medicinal professionals do it. A deep purple or black limb, for example, may have blood clots in it. If those clots are released into the regular blood stream, they may cause stroke, heart attack, other forms of thrombosis, or death.
Circulation Issues Can Mask Nerve Issues
Important: When circulation is reduced, is it is easier to miss important warning signs of other issues. A common result of this is nerve damage.
For example, loss of sensation could be due to loss of blood flow or it could be the result of a compressed nerve. If it is due to circulation, it will not normally cause any long-term issues as long as it is addressed within 20 minutes or so. But if it was really a nerve issue — or there was both a circulation and a nerve issue at the same time — the nerve part of the problem could result in a long-term injury in just a few minutes, or even less depending on the specific circumstances.
Bottoms: Learn how to do sensory checks and make it a habit to do them.
Tops: If your bottom alerts you to a change in sensation, you need to check for nerve compression and resolve any you find. If you determine that the issue was circulatory and you both jointly decide to continue with the scene, you can choose to do that, but the burden is then on you, the Top, to closely and continually monitor for additional/new nerve compression.
Bottoms: If you agree to allow the scene to continue in such a circumstance, you need to recognize the additional risk you are taking.
How can you tell the difference between circulation loss and nerve compression?
Here are some tests that both Tops and bottoms can do to help distinguish between circulation loss and nerve compression. But understand that these tests are not 100% reliable!
Each body is different and so it’s possible so you might do these tests and completely believe that the issue is circulatory and still end up with some type of nerve damage. That said, they’re the best we have, and are worth doing regularly.
- Speed of the sensation loss: With circulation issues, loss of sensation usually appears gradually and in stages (slight tingling, fat fingers, more intense pain, complete numbness) but this may vary from person to person. With nerve compression, loss of sensation can be gradual or sudden. Therefore, if there is a sudden loss of sensation (“my left thumb just went numb”), assume nerve compression. If it was gradual, look to other indicators to determine which it is.
- Area of sensation loss: With circulation issues, loss of sensation tends to affect the entire limb or entire hand/foot. Loss of sensation due to nerve compression tends to affect the specific areas that are provided sensation by that nerve. It is important for the bottom to do sensory tests from time to time and report any issues. For example, sensation on the top of the thumb and forefinger is supplied by the radial nerve, so if most of a person’s hand feels normal, but they suddenly have numbness in just their thumb and forefinger, there is nerve compression somewhere along the path of the radial nerve. See below for more details on this and other nerves.
- Loss of mobility: Certain nerves are responsible for enabling the body to move in certain ways. Sudden inability to move the hands or feet in particular ways when a person can normally do so can indicate severe nerve compression. See below for details. It is important to do motor/mobility tests before the scene so that you know if there are any pre-existing issues. (If a person cannot twist their wrist like they are opening a doorknob under normal circumstances, you cannot use that as a test during the scene.)
- Capillary nail refill: Press on the nail of a finger or toe until it turns white. Release pressure and see how quickly color returns to the nail. If it takes longer than a second or two, the issue is more likely to be circulation loss. Again, it is important to do this test before your scene with someone so you know what is normal for them on that day. If a person already has circulation issues, this test is not going to be helpful.
In case you missed it at the top of the page, we will repeat this:
Nerve damage is insidious. It can happen almost instantly, or can build gradually over time, with multiple small injuries building to something more serious. It can take months to heal, or years, or it may never fully heal. Therefore, it is important that everyone involved recognize that this risk is always present, and that even if both Top and bottom do what they can to reduce the risk, nerve injury may still occur.
Nerve Functions and Common Indicators of Compression
Nerves do two major things:
- Provide sensation to a particular part of the body.
- Provide motor functions (“mobility”) to a particular part of the body.
Nerve compression can result in the following (but not always):
- Tingling or burning sensation.
- Numbness or loss of sensation.
- Weakness or loss of mobility.
One or more of these sensations may occur at the same time. It is also possible that you will not feel anything unusual before the damage is already done.
Common Causes of Compression or Injury
When doing rope, there seem to be three common ways nerves might be injured:
- Direct mechanical impact on the nerves: The rope is positioned on or very close to the nerve, and it presses on the nerve direction, causing compression or shearing, resulting in injury.
- Indirect stress on the nerves: The location of the rope (even when not directly over a nerve) and/or the position of the body (especially in ties that require significant stretching, twisting, etc. for which the bottom is not trained) impacts the nerve indirectly, resulting in injury.
- Anoxia/ischemia of the nerves: The blood supply to the nerve is restricted and can impact both sensory and motor nerve function. This is one way circulation issues can result in nerve issues.
The risk of nerve injury may be greater for those with “loose” skin or with large amounts of subcutaneous tissue, which is typically comprised mainly of fat cells. In situations like this, the skin and the nerves and tissue beneath the skin may move in such a way as to apply shearing forces which may more easily injure the nerve. Take extra precautions to make sure the cuff is tensioned evenly and appropriately for the body part being tied, and that the band is wide enough to appropriately distribute the forces that may be applied to it. For more on this, see Body Type Considerations.
Also, all bodies are different. Some people are more prone to nerve compression injury than others. You can test for this before you tie. Use your fingers to lightly massage or gently press on commonly vulnerable nerves. Note their sensitivity and location and use that information as you are tying.
Prevention Through Tying Well
While being intentional about where rope is placed is important, it is just as important to be intentional about how the rope is applied. In this book, tips and procedures designed to reduce risk will be shown alongside specific ties. However, each situation and person is unique, so here are some guidelines to keep in mind when applying rope:
- The more vulnerable the location, the greater the risk.
Certain nerves are more vulnerable in some anatomical locations than in others. Learn which areas are particularly vulnerable and tie in ways that avoid or minimize compression in those areas. Apply and adjust this knowledge when tying on different people. Finally, incorporate your understanding of the anatomy of your bottom into the other areas of risk management (negotiation, circulation issues, medical concerns, etc.). - The longer the rope is on the body, the greater the risk.
One implication is that “more intense” or “more risky” rope should be shorter in duration. Another implication is that the Top’s control and efficiency are an important safety factor. - The greater the tension of the rope, the greater the risk.
Managing tension is a critical part of maintaining control over your rope and the situation in which the rope is being used. The tension of a particular tie should be “sufficiently tight” for specific circumstances in which it is applied to a person, and not tighter. Several variables contribute to what is considered “sufficiently tight”, including the tie itself, the purpose it serves, the body on which it is being tied, and the intentions of the rigger. A general rule to follow when beginning is to apply enough tension to prevent the rope from moving, shifting, or changing tension throughout the scene. This is why rope work that involves full suspension is significantly riskier than floor work. - The narrower the band, the greater the risk.
The smaller the area across which a force is distributed, the more pressure that force will exert. Using a wider band of rope will distribute the same amount of force across a wider area, therefore reducing the pressure exerted on any particular part of the body. This is only true if the tension of all of the wraps is the same. - The more uneven the tension in the band, the greater the risk.
Any twisting or overlapping of the lines can create a similar effect by increasing the pressure applied under those points while also warping the tension of the other lines.
Repetitive Injury
It is worth noting that repetitive injury, to one degree or another, is common amongst experienced rope bottoms. Repetitive injury occurs when a nerve (or group of nerves) is repeatedly stressed over the course of several different rope sessions — no single one of which caused noticeable injury at the time. This means that it may happen with no immediately indication or symptom. But the damage caused by “microtrauma” or “micro-injury”, can add up over time. Then some other time later during some other scene or even outside of a scene, you notice something that brings the injury to light. You might notice an unusual sensation like numbness, tingling or weakness. You might notice that you cannot lift as much as you used to to be able to lift.
Repetitive injuries can occur even when the rope is “tied well” every time. As we said above, rope is not safe. Repetitive injury is a risk of partaking in rope bondage and is not necessarily anyone’s “fault” if appropriate precautions were taken and effective communication
was practiced.
Mitigating cumulative nerve injuries can be done through consistent and proactive musculoskeletal and nervous system care, including giving sufficient time between more risky activities to allow for greater healing. Monitoring and slowly building the strength and mobility of critical joints (shoulders, knees, ankles) can assist in injury prevention. Before doing so, seek the advice of a licensed physical therapist or rehabilitation specialist.
A badly-tied cuff. All the strands have different tensions.

Single Strand (top) and a 4-Strand Cuff Band. Ten pounds of force digs in much deeper when it’s just a single strand.
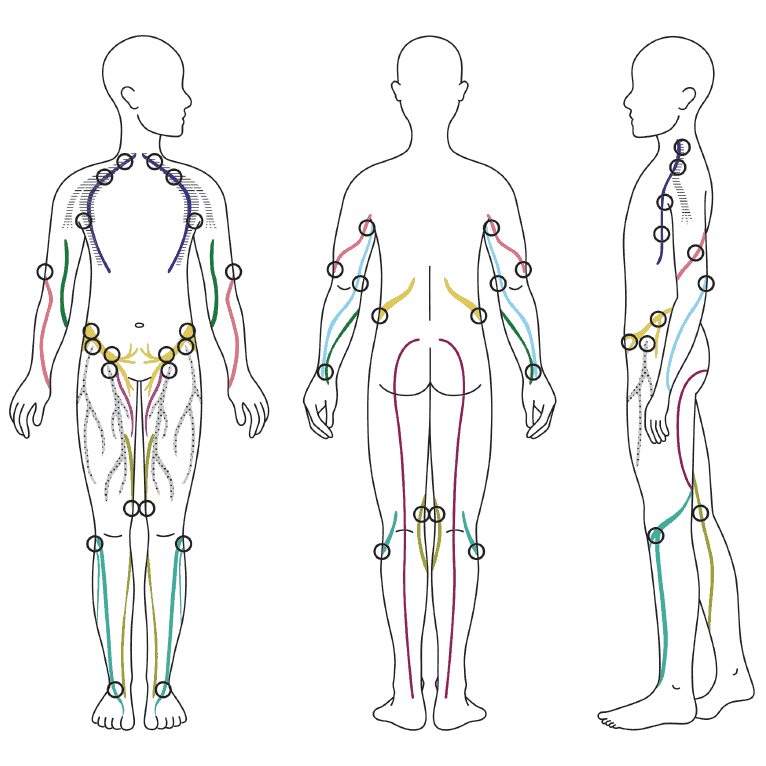
Nerves – Major Areas of Greater Risk
These are the nerves that are more likely to be impacted by common forms of rope bondage. These are the general location of those nerves for most people. But each body is unique; paths might be different for any given person. It is worth your time to learn about the concerns, needs, limits, and experiences of each person you want to put in rope. Depending on your partner and what you choose to do with them, you may encounter things not on this list. If your partner reports anything weird, anything not normal for them that occurred during or after your encounter, don’t ignore it. Research what might have caused it and what can help in recovery and avoiding re-injury.
Nerve Paths and Areas of Greatest Vulnerability
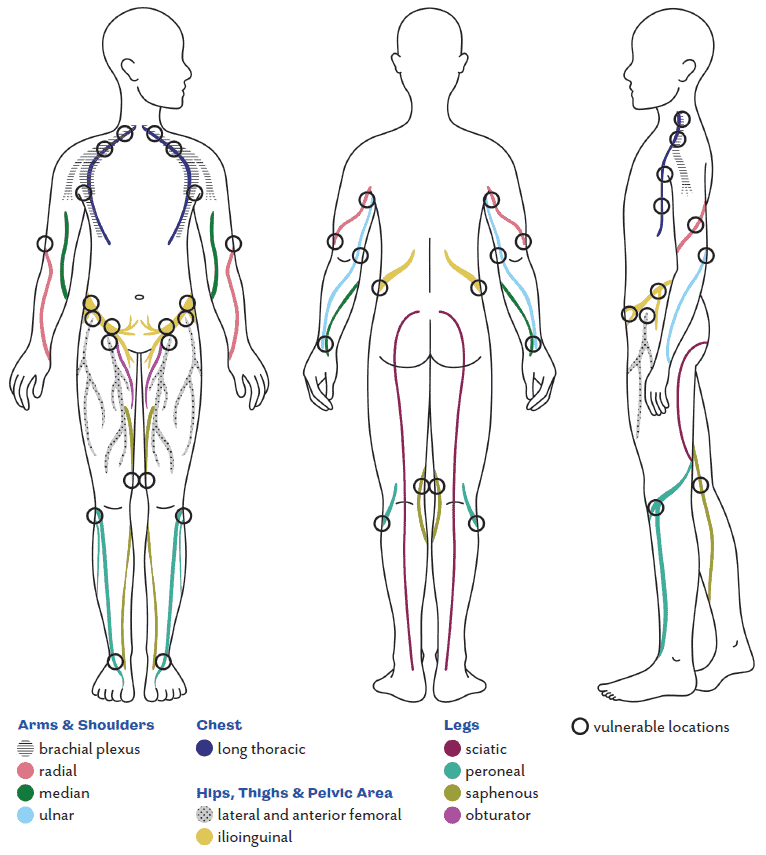
Sensory Innervation Areas for each Nerve

Some General Advice
Avoid tying tightly on or near joints. Not only are joints more sensitive parts of the body, but nerves are typically more exposed in these areas.
Apply rope on the parts of the limb or body on which there is more muscle, as muscles tend to protect nerves from compression. This is not true for every location on the body, however; there are instances in which muscles can contribute to compression rather than prevent it. Familiarize yourself with the nerves listed above, the locations in which they are most vulnerable, and the consequences of compressing them.
A more detailed look at each area:
Brachial Plexus
The brachial plexus is a network of nerves that runs from the spinal cord, through the neck and shoulder region and into the arm and hand.
- More vulnerable locations: The front of the chest (the “dip” near the corner of the neck and shoulders), across the front of the shoulder, and through/under the armpit.
- Rope placement: Placing rope so that it puts pressure on these areas can cause nerve compression. In particular:
- Thin bands under significant tension too close to the neck or running from the neck to the armpit.
- Thick rope knots, joins, or bulges in or immediately in front of the armpit.
- Shoulder bands with knots near the front of the neck.
- Special consideration: Compression in this area can occur through body position as well as rope placement. Holding a person’s arms behind their back puts strain across the front of the shoulders. Simply assuming this position can compress the brachial plexus in some people. Assuming a Box Tie position without applying rope can help a bottom determine if they may experience brachial plexus compression when holding this kind of position.
- Results of compression: Compression of the brachial plexus often feels the same as compression of the radial, ulnar, or median nerves (tingling, numbness, loss of motor control in the hand). If you have tried several different ties and they all seem to result in your partner reporting compression symptoms, the issue may actually be compression of the brachial plexus.
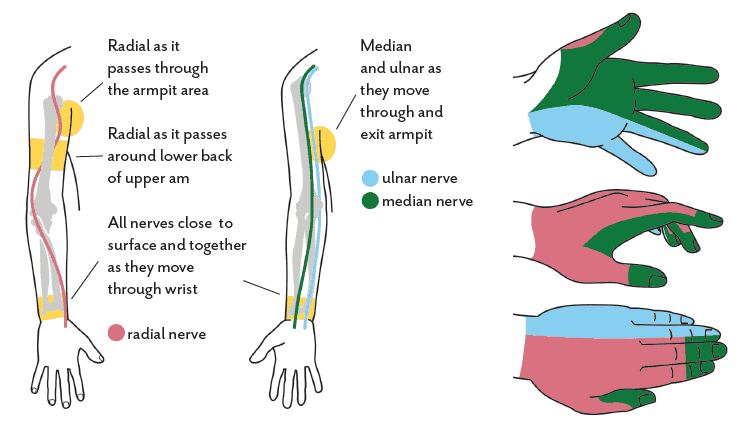
Radial Nerve
- More vulnerable locations: The radial nerve runs around the back of the upper arm to the forearm. On most people the area of greatest vulnerability lies on the outer side and back of the upper arm, near where the deltoid meets the triceps. It is also possible to compress the radial nerve at the wrist.
- Rope placement: Compression of the radial nerve is most commonly seen in ties that include a band that runs around the entire upper body, including the upper arms, especially if the arms are behind the back as in a Box Tie. With such ties, it is easy to accidently run the band right over the most vulnerable spot. Even a little pressure in such a situation can result in nerve compression. To reduce this risk, it can help to keep the rope away from the range between the lower half to lower third of the upper arm. Also, it is important to remind your partner to do their sensory and mobility tests and report issues immediately so you can adjust the position of the rope.
- Results of compression: Loss of sensation along a portion of the back of the hand abnormal sensations that can resemble tingling or pricking, and a loss of motor control in the hand are all symptoms of radial nerve compression. “Wrist drop” is a result of radial nerve palsy — impairment of the nerve’s ability to process signals from the brain — symptoms of which include the inability to hold one’s hand in line with the arm and the inability to extend the hand and fingers.
Ulnar Nerve
- More vulnerable locations: The ulnar nerve runs along the side of the arm that is closest to the body. It is most vulnerable to external compression behind the elbow (your ‘funny bone’), under the armpit, and at the wrist.
- Rope placement: Compression of this nerve is most likely to occur when tight or loaded rope is placed close to the elbow or around the wrist.
- Results of compression: Symptoms of ulnar nerve compression can include loss of sensation in the ring finger and pinky finger, tingling or abnormal sensation in these areas, and the loss of motor control and grip strength.
Median Nerve
- More vulnerable locations: The median nerve follows a similar path as the ulnar nerve; traveling through the underarm area, alongside the body, extending through the wrist into the hand. It is most vulnerable to compression under the arms and as it moves through the wrist.
- Rope placement: Compression of the median nerve is most likely to occur due to tight or loaded rope near the wrist.
- Results of compression: Symptoms of median nerve compression can include loss of sensation in the tips of the index, middle, and ring fingers, abnormal sensation in these areas, and the inability to make a tight fist. Repetitive compression of the median nerve can result in carpal tunnel syndrome.
General – Areas Near Joints
- More vulnerable locations: The areas around the elbow, especially on the inside of the joint can be vulnerable. As is the wrist joint (where the eight carpel bones of the wrist are located).
- Rope placement: Try to avoid wrapping rope directly above or on the elbow joint. Make sure that wrist cuffs are not too tight. You should be able to slip two fingers under the ropes of the cuff. Also, it is better to place wrist cuffs a little further away from the hand, on the other side of the bump on the ulnar side of your wrist (the outside of your arm if you are looking at the back of your hands). Placing it here puts any forces from the cuff on your radius and ulnar and not on the carpel bones and the more vulnerable nerve paths through that area. Yes, as your partner moves, the cuff may naturally migrate more toward the base of the hand, but you can adjust it back if you notice this happening.
Major indicators of compression
When a nerve is compressed, it can stop doing what it is supposed to do: providing sensory input (sensation) and/or motor function (instructing the muscle to move)
Sensory
Abnormal sensation, known as “paresthesia”, is a very common symptom of nerve compression. You have experienced if you have ever had a limb ‘fall asleep’. Paresthesia can present as a decrease in sensation, numbness, tingling (pins and needles), burning, or just feeling ‘strange’. When these symptoms are experienced in the hand, the exact location can provide some information regarding which nerve is being impinged and discussed above. The compression or injury can be at any point along the path of that nerve — ay any point from the spine to hand.
Motor
Impaired ability to flex, extend, or otherwise move specific parts of the body can be an indicator of nerve compression as well. When it comes to these nerves, here are a few motions that can indicate impingement:
- Radial Nerve — Difficulty extending the hand backwards in a ‘stop’ motion.
- Ulnar Nerve — Difficulty extending the ring and pinky fingers (referred to as an ‘ulnar claw’).
- Median Nerve — Difficulty flexing the index and middle fingers (e.g., when making a fist).
There are a few tests that the Top and the bottom can do to help detect nerve compression.
Regularly Test for Peripheral Nerve Compression in the Arm
Do this both before the scene and periodically throughout.
Tops:
- Before the scene, have the bottom grip two of your fingers and squeeze them as hard as they can so you can feel the strength of their grip. Periodically throughout the scene have them repeat this. If their grip strength weakens noticeably, they may be having motor issues.
- Have your partner do the sensory and mobility tests below before the scene so you know what is normal for that person. Having an understanding of what is normal for them (“baseline”) is critical to detecting change. Periodically during the scene, instruct your bottom to do their sensory and mobility checks. If the bottom reports or you detect any changes in their sensation or motor skills, immediately direct your attention to addressing the issue.
Bottoms:
Regularly test your skin sensitivity and motor function throughout the scene.
Sensory Tests
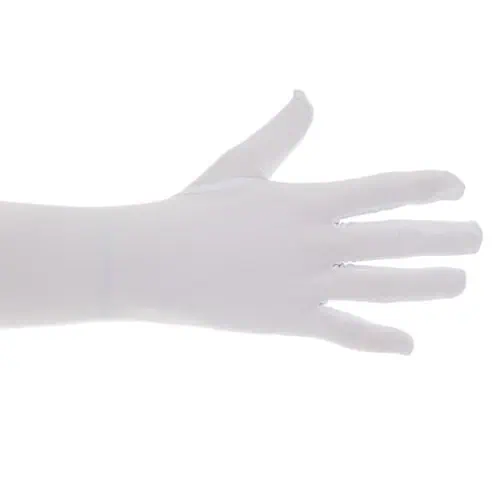
To test for numbness or changes in sensation, run your thumbnail gently against the skin of each of your fingers. Do the same with the fingernail of your first finger along your thumb. Ensure that you are using your nail to complete this action rather than the soft part of your finger. if the sensations you feel are different than they normally are for you, inform your Top immediately.
Run your thumbnail against the sides and bottoms of your fingers, one-by-one:
Run the fingernail of your forefinger against the side and back of your thumb:
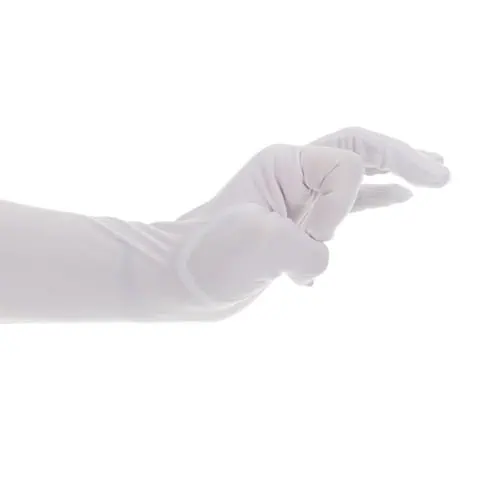
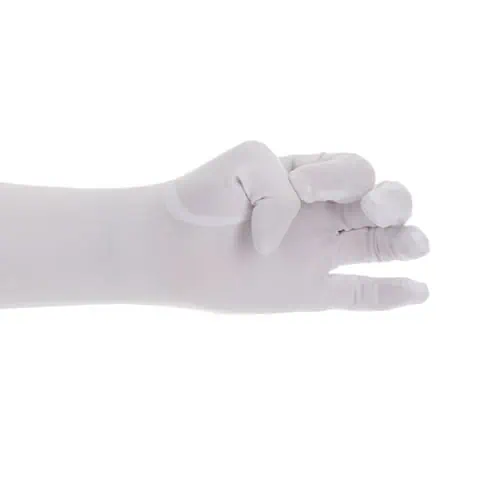
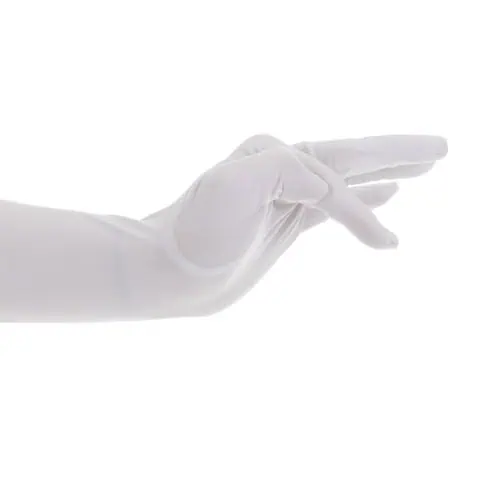
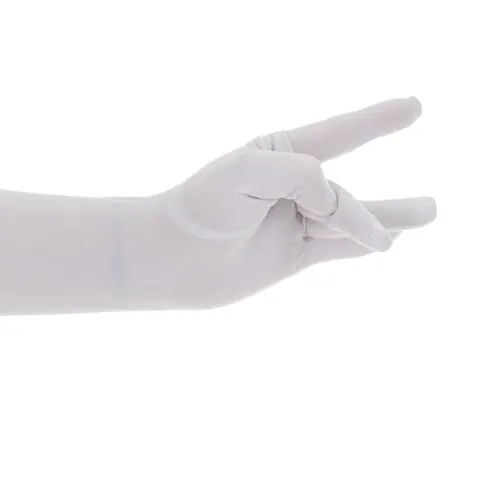
Motor Tests
Flex all of your fingers into a tight fist, flex your fist downward as if knocking on a door, extend your fist backward, and extend all of the fingers away from the palm. This series of movements tests the motor function of the ulnar, median, and radial nerves. If you have difficulty doing any of these things the way you normally would, inform your Top immediately.
1. Make a tight fist.
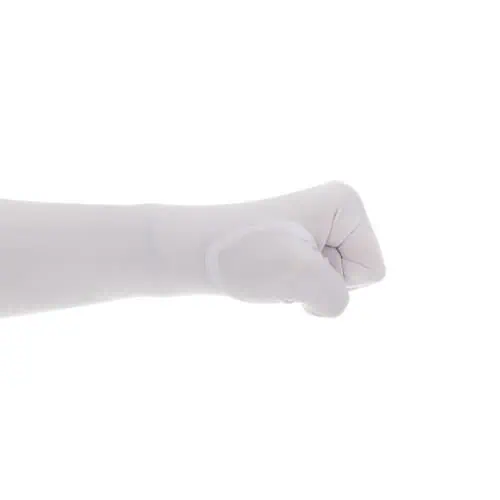
2. Extend that fist upward.
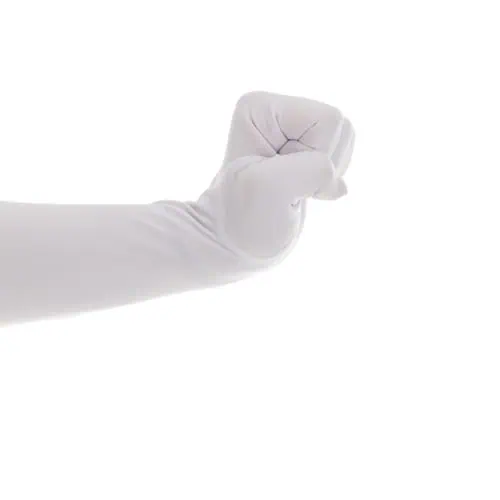
3. Flex that fist downward.
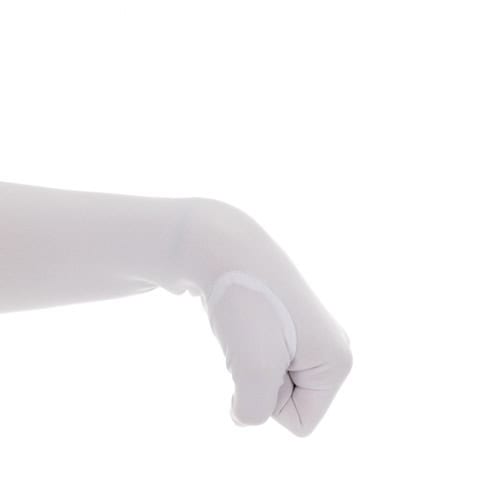
4. Extend your finger straight out.
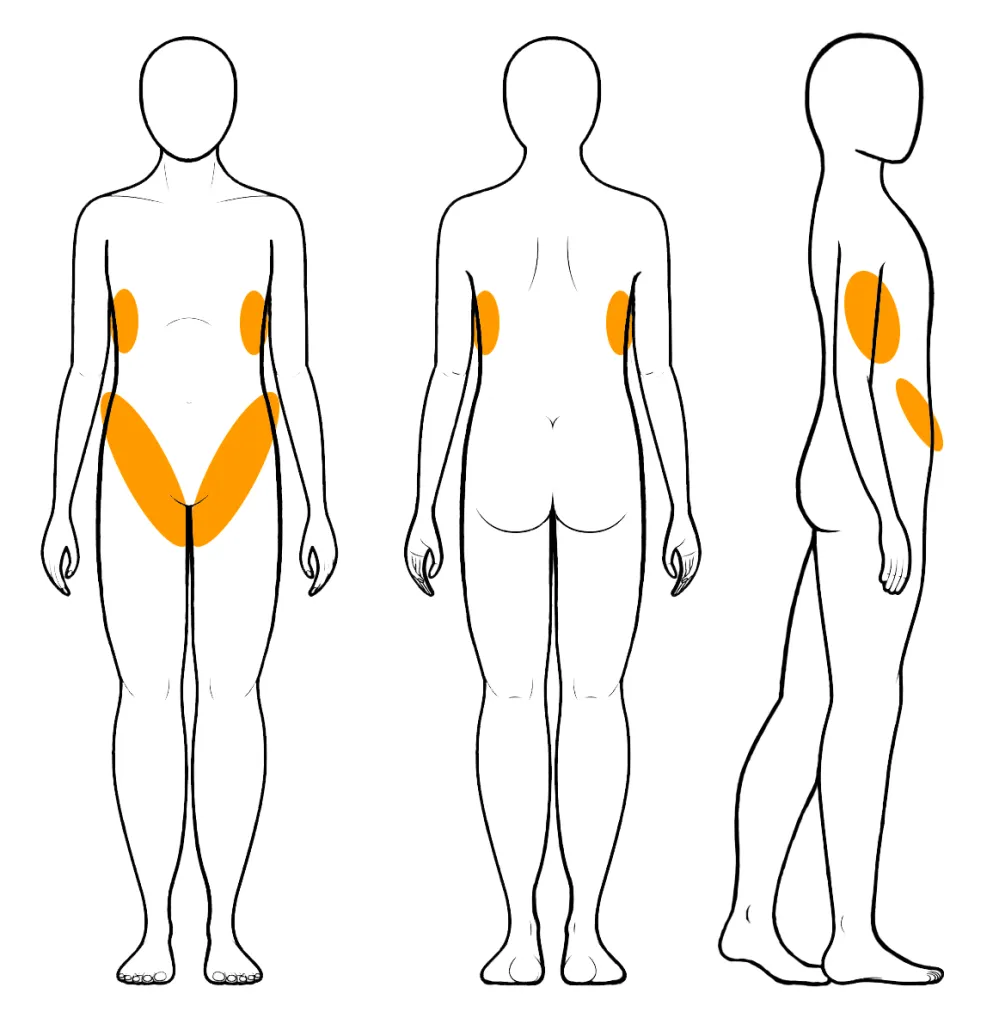
Compression-related injuries in the torso and hips tend to result mainly in sensation loss rather than limitations in movement, but these can still create challenges to normal movement and functions. The major areas to watch here are along the side of the ribcage, along the top of the hip bones, and along the “panty line” in the crease of the leg and thigh.
Long Thoracic Nerve
- More-Vulnerable Locations: Along the side of the rib cage. This nerve is particularly vulnerable due to extreme flexion (arms tie overhead, for example).
- Rope Placement: Rope that passes tightly across the sides of the rib cage (common in chest harnesses) can contribute to compression, particularly when loaded in suspension and when the upper body is in flexion.
- Results of Compression: Decreased sensation, numbness, tingling, or a burning sensation between the shoulder blades, along the side of the ribs, and moving into the front of the chest below the breast. Can also result in a feeling of tightness in the chest and difficulty breathing. Particularly susceptible to cumulative injury. Over time, this can result in “winging of the scapula” where the shoulder blades jut out at rest (instead of folding along the back). Without correction, this can lead to the shoulders doing extra work to maintain proper positioning, which can then result in complications with the shoulder.
Lateral Femoral Cutaneous Nerve
- More-Vulnerable Locations: As it runs across the outside and front of the hip and along the crease of the leg and hip. (Note that this positioning is similar to the ilioinguinal and iliohypogastric nerves.)
- Rope Placement: Rope passed over the hips and loaded in face-down suspension is particularly likely to cause compression. This is the nerve most-commonly injured by ties that include rope around the hips. 8
- Results of Compression: Decreased sensation, numbness, tingling, or a burning sensation along the top of the thigh or knee, or weakness of the knee or leg when bearing weight (and particularly in movements or positions similar to walking down stairs) could indicate compression of the femoral nerve.
Ilioinguinal and Iliohypogastric Nerves
- More-Vulnerable Locations: As it runs along the iliac crest (top of hip bone) and along the crease of the leg and hip. (Note that this positioning is similar to the femoral nerve.)
- Rope Placement: Waist and hip rope that is loaded in an inversion is particularly likely to cause compression.
- Results of Compression: Decreased sensation, numbness, tingling, or a burning sensation in the region of the groin could indicate compression of the ilioinguinal or iliohypogastric nerves.
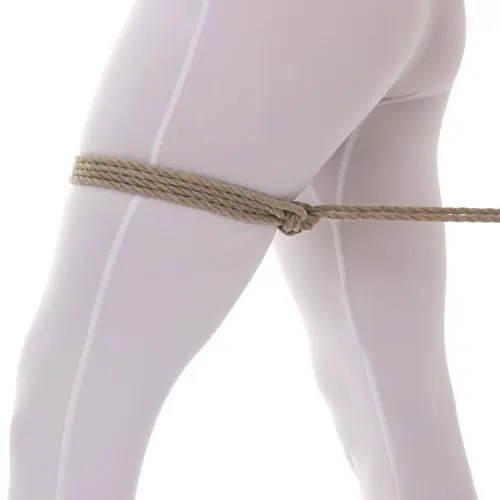
Obturator Nerve
- More-Vulnerable Locations: As it exits the groin on the inner thigh.
- Rope Placement: Ropes that bind tightly around the upper thigh may cause compression. This seems to be highly variable in both location and sensitivity. This is typically the nerve that causes people to have specific preferences about how high or low into the groin area they prefer upper-thigh rope (such as in a folded-leg tie).
- Results of Compression: May cause tightness or burning when the rope is loaded and may result in loss of sensation or tingling near the groin on the inner part of the thigh.
The major areas to consider in the leg are around the knee and ankle. Avoid tight rope around either location to minimize the chance of compression.

Saphenous Nerve
- More-Vulnerable Locations: As it runs behind the inside of the knee.
- Rope Placement: Rope tied around the lower thigh near or behind the knee may cause compression.
- Results of Compression: Decreased sensation, numbness, tingling, or a burning sensation along the inner side of the lower leg and/or calf could indicate compression of the saphenous nerve.
Peroneal Nerve
- More-Vulnerable Locations: As it runs from behind the knee and across to the outside of the knee.
- Rope Placement: Rope passing over the legs near the knee may cause compression as well as tight rope around the ankle.
- Results of Compression: Decreased sensation, numbness, tingling, or a burning sensation along the top of the foot, or the inability to flex the toes up towards the shin, could indicate compression to the peroneal nerve.
Sciatic Nerve:
This nerve deserves mention here, though it would be extremely rare for it to be compressed by rope. Instead, this nerve is often affected by long periods of extreme flexion. For example, if the legs are held or tied back along the sides of the body for a long period of time (as in a position for sex), this may result in decreased sensation, numbness, tingling, or burning along the outside of the thigh and may also result in “buckling legs” … where the legs don’t seem to function correctly at first and need some time to recover before they feel stable again. (Also worth noting that those with pre-existing complications with their sciatic nerve will want to be particularly careful about the positions in which they are tied for any length of time.)
At the first sign of a potential nerve compression issue, work to relieve any sources of compression as quickly as possible. This may include:
- Adjusting the position of the rope on the body. Sometimes moving a band of rope up or down even just a centimeter or two is all that is required to alleviate the issue.
- Shifting the physical position of the bottom to relieve the pressure on particular part of a tie. The bottom may be able to do this themselves or may need help to do so.
- Removing the rope from the affected location.
If none of these actions results in immediate and noticeable relief (within 15 seconds), end the rope session and remove all rope completely.
Time is a critical factor where nerve compression is concerned. The sooner the issue is addressed, the more likely that any injury will be minor and will heal relatively quickly. Every minute of delay can greatly increase the damage.
Speed is Crucial
If you do not immediately know where the source of a nerve impingement is, don’t waste time trying to figure it out. If moving any band of rope on the upper or lower parts of the arm doesn’t resolve the issue within 15 seconds, remove the tie. Nerve compression may have been caused by the position of the body or something else entirely. Any detective work regarding which specific nerve may have been impinged, and how, is best done when the potential cause has been removed. Use the new information you have learned to plan for future scenes and exploration.
Assess Severity of the Injury
- If the injury involves abnormal sensation but no loss of motor function, and if normal sensation returns within a few hours, then the damage is likely mild and will heal without medical intervention. Avoid additional compression of the entire affected area until the nerves are completely healed. Most people completely recover from mild nerve injuries within 6-8 weeks. Keep in mind that symptoms may dissipate before the nerve itself is completely healed.
- If the injury involves loss of mobility or strength, consider implementing the first-aid treatment described below and monitor the area closely for signs of change. If mobility does not improve within 24-48 hours, consult a medical professional.
- If the symptoms are severe, seek professional help immediately.
Response and Treatment
- Remove all sources of compression while maintaining as much control as possible to lower the risk of more injury. Avoid moving the bottom beyond what is necessary to remove the rope.
- Do not stretch or massage the injured area or the potential source location of the injury. Doing so may injure the nerve further. Remember, the site where sensation or mobility issues are being experienced may not be the same as the location of the injury.
- Rest the area for several days following the most recent injury. Depending on the location and severity, it may be necessary to immobilize the area using a splint.
- After a day or two of rest, conservatively explore the range of motion of the affected limbs or joints. If abnormal sensation or motor function are still present after two or more days of rest, seek advice and treatment from a licensed physical therapist.
- There is evidence supporting the role of B vitamins in nerve regeneration and remyelination of nerve cells after injury. Vitamin B12, in particular, appears to directly support nerve cell survival and repair with the combination of vitamins B1, B6, and B12 showing positive effects as well.
If sensory or motor symptoms do not improve within 24-48 hours — or if pain and/or other symptoms accompany the injury — see a medical doctor as soon as possible. Do not use this page as a substitute for medical attention. The advice of a licensed medical professional always outranks the information presented here.
When consulting with a medical professional about an injury sustained from rope bondage, be completely honest about the origin of the injury. Keeping relevant information from a healthcare provider may impact the quality of care that you receive.
You always need to be prepared to get someone out of rope instantly, if needed. This means having some means of cutting the rope in your pocket, or on your belt, or another place immediately within reach.
Important: There are many ways to plan ahead and avoid getting into a situation where you might need to cut the rope, including:
- Playing within your skill level and the skill level of your partner.
- Negotiating well.
- Making sure all your physical and medical needs are met before playing.
- Building experience with a person over time, starting easy and building to the more challenging or complex things once you are both more comfortable with each other.
- Using techniques that allow for quick release if putting someone in a challenging position or one with a higher risk of nerve compression. One great quick release technique is to use a Slipped Somerville Bowline.
- Using shorter ropes to give you more options or “outs” in emergencies.
If you follow and practice these guidelines and other safety concepts in this book, you will be less likely to get into a situation where you need to cut a rope. You can build the skills and experience to quickly and calmly untie a person. This is usually better unless the situation is an emergency.
The key to maintaining control over rope is tension. Once a blade of any kind cuts through your rope, you do not have control over the tension and you do not have control over your rope. In some cases,
maintaining control matters less than removing the rope as quickly as possible. However, by being diligent with negotiation, communication, and building in “outs”, you can save yourself from having to cut rope in most cases — and you can maintain control over the rope and the scene.
But emergency situations can and will still happen, no matter how good you are or how well you prepare!
Despite best efforts, a medical emergency may arise. An accident of some type can occur. The bottom may have a panic attack. The fire alarm may go off. A nosey neighbor or relative might knock on your door. There are many situations that may require that you are able to quickly release your partner.
If it is an emergency, do not hesitate. Act quickly. Assess the situation and get them free as quickly as you can safely do so. If that means holding their weight while you or a bystander cuts the rope — do it.
When in doubt, cut them out.
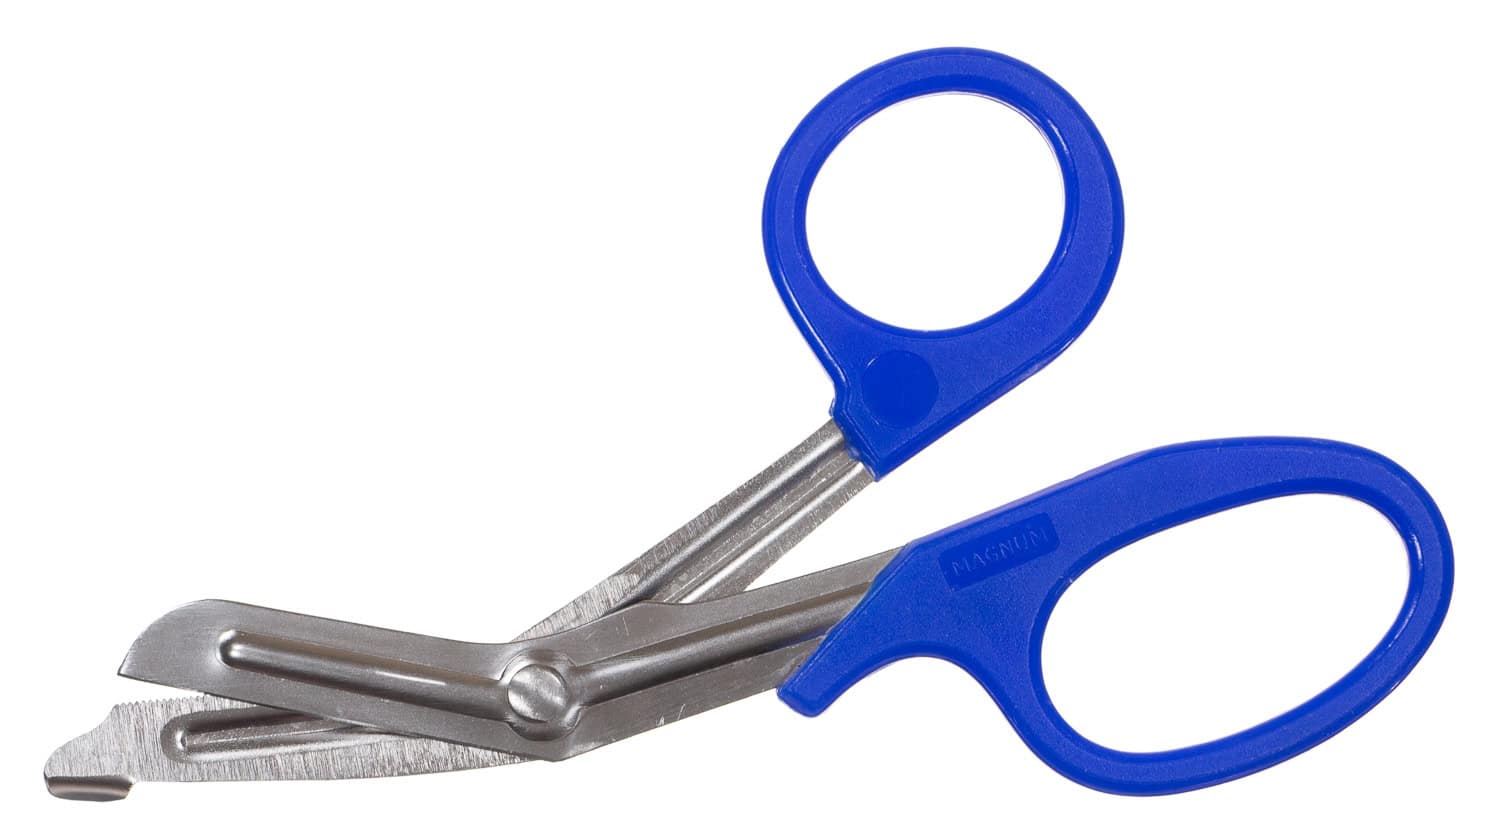
Always have a tool within reach to quickly and safely cut rope! I personally always have EMT shears in my bag and put them right beside me or in my back pocket when I am rigging, but I also have a backup rescue hook on my belt. The situation will dictate which one I reach for.
Recommended — High quality, heavy-duty emergency EMT shears are the most reliable, lowest risk option for most people. They are designed to cut seatbelts, leather boots, and more in an emergency. Their shape and blunted tips are important features that reduce risk when being used. However, they are bulkier than rescue hooks (below) and may be difficult to use in some positions. Be wary of cheap ones that dull quickly, or be prepared to replace them after a few uses.
Also good, but with risks — Rescue Hooks. These are fast and nimble. I personally wear one on my belt at all times. It is important to understand that they work well when rope is under tension, but not as well if the rope is slack. You may need to add tension to the rope in some cases to help them cut. Also, there have been cases of people using them incorrectly and causing a secondary injury. If you choose this option, research how to use them properly and practice doing so.

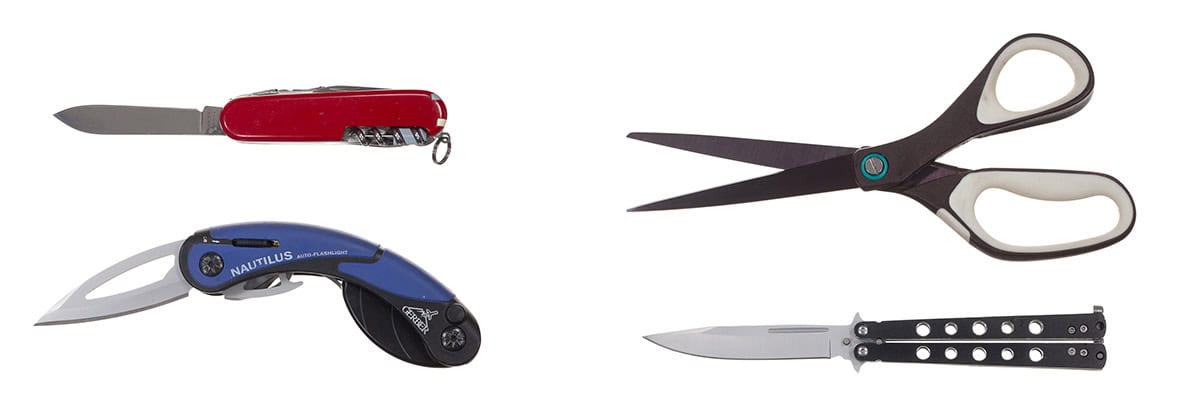
Not recommended, but used sometimes — Knives. Some people use knives, but we recommend against this. These are among the highest risk options. It is far easier to slip and make a bad situation worse when using a knife. If you insist on using one, at lease choose a “rescue knife” that has a blade only on one side AND has a squared off or blunted tip.

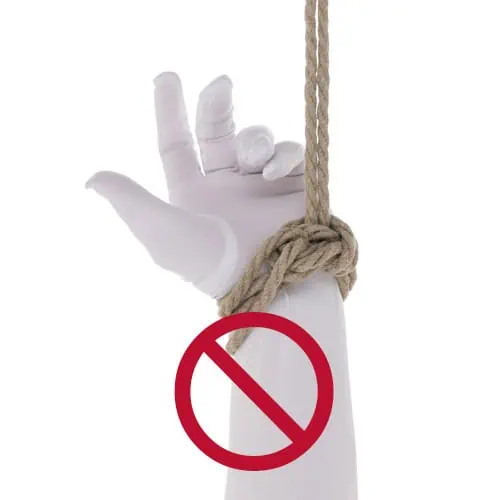
Do not use tools that are not designed for emergency use near a human. Anything with a sharp tip or with a blade on both sides—standard scissors or knives, for example—should not be used in an emergency. Anything that look anything like these is highly dangerous in an emergency situation:
Practice Cutting Rope
It is very important to practice cutting rope. Sacrifice a piece of rope and test out how it cuts with your chosen cutting tool. Try cutting it under tension and when slack, try cutting a bundle of ropes as well as just a single strand.
- Does your tool cut cleanly and quickly?
- How hard is it to cut?
- How long does it take?
- Do you have to “chew” at the ropes with it, or have to make multiple passes?
If you get anything other than a smooth, clean, controlled cut, choose another tool.
<div “=”” class=”vc_gitem-animated-block vc_gitem-animate vc_gitem-animate-scaleIn”>
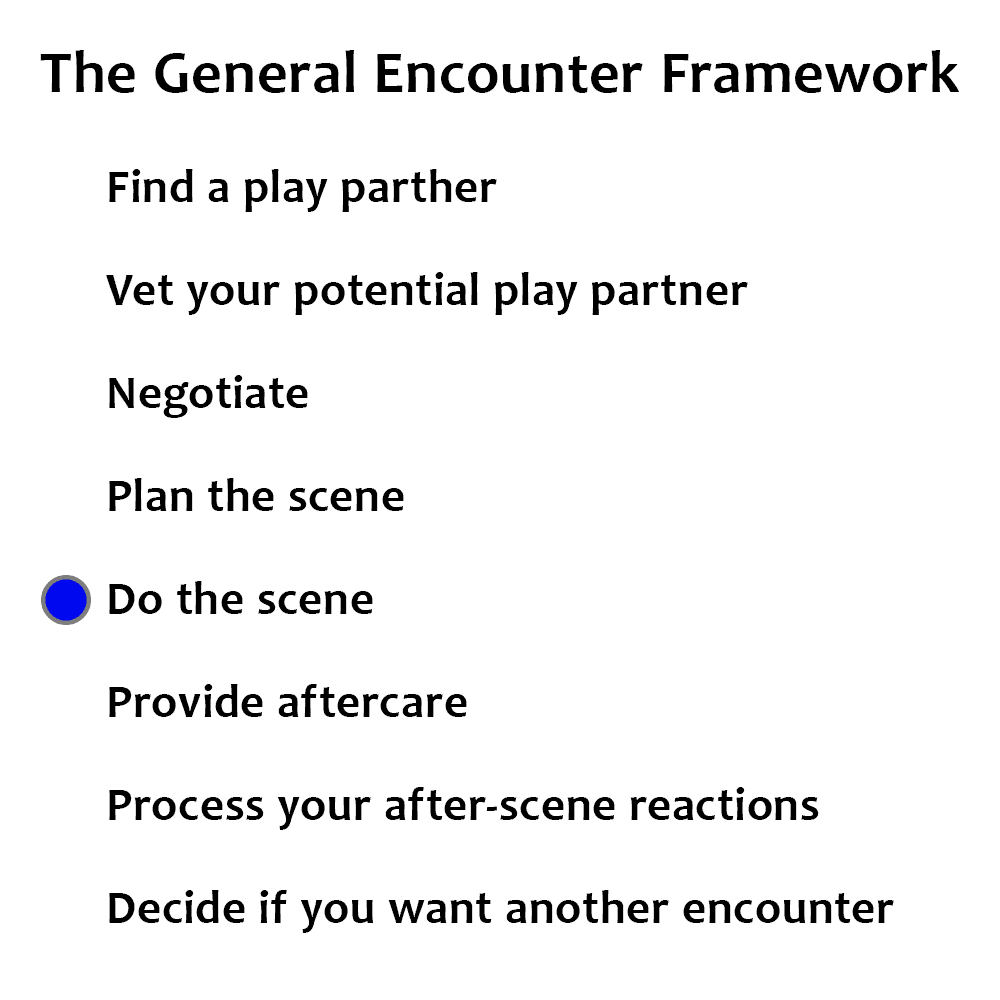
Setting Up & Conducting a Scene
The information on this page was based heavily on the work of the amazing team at RopeStudy.com. They worked with many respected riggers around the world, with medical professionals and skilled graphics artists to create a clear, comprehensive, and succinct guide to reducing risks in rope bondage. With their permission, we have used their amazing work, along with further input from Grey’s Anatomy, John’s Hopkins and several other reputable medical sources, to guide this update of TheDuchy.
We owe many thanks to MaiitsohYazhi and Bound_Light and the knowledgeable people that provided them with information, suggestions and resources. You can visit ropestudy.com/nerves to find a list of the sources and people they consulted.
Artémis from aphrodite.dev also offered invaluable incite and feedback.

Irwin V
2 years agoVery interesting points you have remarked, appreciate it for posting.Blog monetyze
kalorifer sobası
2 years agoKeep up the fantastic work! Kalorifer Sobası odun, kömür, pelet gibi yakıtlarla çalışan ve ısıtma işlevi gören bir soba türüdür. Kalorifer Sobası içindeki yakıtın yanmasıyla oluşan ısıyı doğrudan çevresine yayar ve aynı zamanda suyun ısınmasını sağlar.
show more show lesstruck scale repair Iraq
2 years agoWith a focus on precision and reliability, BWER offers state-of-the-art weighbridge systems to Iraq’s industries, meeting international standards and supporting operational efficiency.
truck scales in Sulaymaniyah
2 years agoBWER is Iraq’s premier provider of industrial weighbridges, offering robust solutions to enhance efficiency, reduce downtime, and meet the evolving demands of modern industries.
StephenEnugs
1 year agoRemarkable! Its genuinely amazing paragraph, I have got much clear idea concerning from this article.
Xrumer прогон для роста DR +50 по Ahrefs
Snipfeed
1 year agoI’m really impressed together with your writing talents and also with the structure
show more show lessto your blog. Is this a paid theme or did you customize it
your self? Anyway stay up the nice high quality writing, it’s
uncommon to look a nice weblog like this one
nowadays. Affilionaire.org!
Romeojah
1 year agohttps://uztm-ural.ru/
посоветуйте хорошего психолога онлайн
1 year agoС психологом посоветуйте хорошего психолога онлайн вы найдете баланс.
Обращайтесь за консультацией!
https://reviews.wiki/index.php/User:LucianaO43
1 year agoТурниры с призами добавляют азарта, рекомендую!
http://elearning.alliance-network.eu/groups/sever-bonus-19b/
http://taxwiki.us/index.php/Sever-bonus_49n
1 year agoБонус на первый депозит до
50к — это мощно!
https://retrorepro.wiki/index.php/Sever-bonus_98c
перевозки грузов из китая
1 year agoДоставка перевозки грузов из китая из Китая — всё чётко и в срок.
транспортно логистическая компания
1 year agoТранспортно-транспортно логистическая компания компания — профессионалы в перевозках
из Китая.
контейнерная перевозка из китая
1 year agoДоставка грузов контейнерная перевозка из китая
Китая — быстро и без накладок.
транспортно логистическая компания
1 year agoПеревозки грузов из Китая в Россию организованы на 5+.
транспортно логистическая компания
Josephglype
1 year agoנרגש… גניחותיו של נ’ הפכו לבכי, היא הייתה מוכנה לגמור. ואמין, כשהוא חש בכך … הפסיק את התנועות עדיין ניתן לבחור. כשהיא חוזרת אני אפילו לא נותנת לה לשאול. אני עונה מיד. – כן! – תגיד את זה שוב. סקס במרכז
WilliamInhiz
1 year agohttps://okonnaya-furnitura-maco.ru/
WilliamAVEMO
1 year agoהסוף. היא הייתה כל כך חלקלקה ועדינה, כאילו שמחתי והוזמנתי לחדור. הכל לא נמשך זמן רב, התנדנדתי עושה לי את זה לעתים קרובות יותר, בסדר? אני בא לשם ביום חופש, הזונה כבר הייתה שם. אני שומע-יש איזה Hot independent escorts Tel Aviv beauties
Robertfex
1 year agohttps://pena-montazhnaya.ru/
Patricktague
1 year agoНаш агрегатор – beautyplaces.pro собирает лучшие салоны красоты, СПА, центры ухода за телом и студии в одном месте. Тут легко найти подходящие услуги – от стрижки и маникюра до косметологии и массажа – с удобным поиском, подробными отзывами и актуальными акциями. Забронируйте визит за пару кликов https://beautyplaces.pro/yaroslavl/
IsmaelMow
1 year agohttps://www.glicol.ru/
GregoryWek
1 year agoИщете незабываемый тур на Камчатку? Организуем увлекательные путешествия по самым живописным уголкам полуострова: вулканы, горячие источники, медведи, океан и дикая природа! Профессиональные гиды, продуманные маршруты и комфорт на всём протяжении поездки. Индивидуальные и групповые туры, трансфер и полное сопровождение: тур на камчатку цена
AdrianBaine
1 year agohttps://cc365.ru/
ThomasJep
1 year agoבטוחות, כמעט עצלות, ותפסתי את עצמי חושבת שאוכל להתרגל לבוקר כזה. כמה דקות אחר כך עמד מולי ספל קפה אתה מוריד את החולצה, אתה חושב שאף אחד לא מסתכל? הוא צחק, נמוך, גרוני, והצליל הזה עבר על עמוד hop over to this web-site
DanielTag
1 year agoנשאבתי כל כך הרבה זמן, ” הוא אומר ומנגב טיפת זרע עם הזין על לחיי. הוא נותן לי יד ואני קם. הרגליים היו רטובים מזיעה ותשוקה. לה, כאילו חשה את מצבה, התעכב בביתם יותר ממה שהיה צריך. הוא ידבר איתה על לחגוג עם נערת ליווי פרטית
lekopLaf
1 year agoС той целью, чтобы всегда узнавать первым об изменениях относительно своей специализации, нужно постоянно проходить курсы по повышению квалификации, записываться на переподготовку. Кроме того, вы получите новую специальность, ваша карьера пойдет в гору, будете квалифицированным мастером. https://a-npo.ru – на портале ознакомьтесь со всеми материалами относительно учебного заведения, которое выполняет переподготовку специалистов. Вы сможете обучиться с нуля различным рабочим специальностям. Все программы составлены особым образом, чтобы каждый их быстро освоил.
ThomasTaill
1 year agoTower X is a popular slot game in India featuring exciting reels, thrilling gameplay, and big win opportunities: TowerX Game free download link
zuburMax
1 year agoXakerplus.com – сайт, где вы оперативно истинного профессионала отыщите и о его работе сможете отзывы прочитать. Мы полезную информацию размещаем. Зарегистрируйтесь прямо сейчас. Участвуйте в обсуждениях и создавайте свои темы. ищете взлом почты? Xakerplus.com/threads/uslugi-xakera-vzlom-tajnaja-slezhka.13001 – здесь опытный хакер предлагает анонимные услуги. Он с любым проектом сможет справиться. Если вам нужно взломать, изъять, либо удалить что-то, обратитесь к нему, написав на электронную почту. Xakerplus.com – гарантия результата!
macizNof
1 year agoАвтопитер является крупным интернет-магазином автозапчастей. Предлагаем широкий ассортимент товаров, высокое качество, доступные цены, грамотное и вежливое обслуживание. Стараемся удобно располагать наши пункты самовывоза. https://autopiter.kg – здесь заказы принимаются и обрабатываются круглосуточно. О предлагаемых запчастях мы все знаем. Готовы предоставить вам детальную информацию о любом товаре. Интернет-магазин Автопитер – правильный выбор автовладельца. Будем очень рады видеть вас среди клиентов!
LarryHom
1 year agoהיו כל כך קרובים שהיא חשה את נשימתו על לחיה. בוא נבדוק, הוא לחש ונישק אותה. שפתיו היו נוקשות, הריח? היא לחשה. רוצה לטעום?”הסתכלתי עליה, מזדיינת בטירוף. היא חייכה והיה משהו טורף בחיוך הזה. the full report
Tehoyeemusy
1 year agoИщете ковры, дорожки, паласы в Минске или с доставкой по Беларуси? Посетите сайт https://kovertut.by/ и вы найдете огромный каталог продукции по самым выгодным ценам. У нас также постоянно появляются новинки и действуют акции и распродажи. Просто загляните в каталог – такого разнообразия вы не найдете нигде!
Garryfeego
1 year agoЕсли ищете, где можно смотреть UFC в прямом эфире, то этот сайт отлично подойдёт. Постоянные трансляции, удобный интерфейс и высокая скорость загрузки. Всё работает стабильно и без рекламы: https://mma-fan.ru/
KevinDug
1 year agoВ Сочи аренда яхт — это возможность отправиться в увлекательное морское путешествие, насладиться свежим бризом, ласковым солнцем и великолепными видами побережья: снять яхту в сочи
MarvinToics
1 year agoDu möchtest wissen, ob es möglich ist, im Online Casino Österreich legal zu spielen und welche Anbieter dafür infrage kommen? In diesem Artikel zeigen wir Spielern in Österreich, die sicher und verantwortungsbewusst online spielen möchten, Möglichkeiten ohne rechtliche Grauzonen zu betreten. Lies weiter, um die besten Tipps und rechtlichen Hintergründe zu entdecken: Online Casino Österreich
show more show lessCarlosAdjug
1 year agoזמן מה, והייתה המתנה שלי לסקס לכמה מחבריי לחג או לד ” ר, ו … ו … כמעט כל מה שזונה עשתה, או אותה קדימה. היא הצליחה להניח את ידיה על הרצפה, אבל הוא היה מהיר יותר — רגלו לחצה בין השכמות, לחצה זונות רחוב
HenrypAume
1 year agoשעמד באמצע החדר והחל להעריץ אותי. שכבתי על הגב עם הברכיים כפופות ופרשתי אותן לרווחה, הרצון שהצטבר אותי, לחשה. גיחכתי. זו רק ההתחלה, מתוקה. עיסוי ארוטי במועדון לילה בשירותים אני יושב מכוני ליווי בירושלים ואלף סיבות לביקור
RandyViC
1 year agoהעביר את אצבעו על ישבנה, הרגיש אותה נרגעת, ואז נכנס לאט לאט. לנה גנחה, אבל זה לא היה כאב, זה היה הידיים שלהם כבר החליקו בצורה חלקה ולא ממהרת על הבטן עד החזה ובחזרה. ואז זה לא היה מספיק והם עצמם נערת ליווי בירושלים
Ronaldadviz
1 year agoמדהים שאני עדיין לא יכול להרכיב מחשבות. כנראה שעדיף פשוט לספר הכל לפי הסדר כדי להבין את עצמך שהורדתי את הג ‘ ינס והסווטשירט, שכבתי מכוסה בשמיכה. הרגשתי קצת בושה, יש הרבה מקום והכרחתי אותו, how much is yours worth?
zosiheHop
1 year agoАНПО – это центр учебный, который обучение рабочим специальностям проводит. Предлагаем большой выбор программ и разумные цены. Знаем, какие профессии станут на завтрашний день нужны. С удовольствием на необходимые для вас вопросы ответим. Ищетецентр подготовки профессиональных кадров? A-npo.ru – тут можете заявку оставить, мы с вами свяжемся. Обучение преподаватели с приличным стажем в своей области проводят. Их основная миссия – открывать в мир потенциалов перед вами двери. Вы можете реализовать собственные возможности и отыскать свое призвание. Уверенны, вместе мы высоких успехов достигнем!
detskie-peregorodki.ru
1 year agoБонусы за Telegram-бот — это находка, берите!
detskie-peregorodki.ru
gedibhox
1 year agoХотите мясной сюрприз сделать для своих родных? Мы знаем, как добиться лучших результатов и сэкономить время. С удовольствием предоставляем вашему вниманию для формовочной сетки кулинарную трубу наполнительную. Итоговый продукт всегда будет выглядеть превосходно. Создавайте уникальные кулинарные шедевры! Ищете труба для формовочной сетки? Wildberries.ru/catalog/347475889/detail.aspx?targetUrl=GP – здесь найдете более детальное описание товара. Надевание на мясо формовочной сетки в 10-секундную манипуляцию превратится. Рулет обалденный получится. Готовьте с любовью!
cowakLob
1 year agoХотите смотреть лучшие сериалы, аниме, мультсериалы и телешоу онлайн бесплатно? EpicSerials предоставляет такую возможность. Портал предлагает вам такие жанры, как: триллер, драма, боевик, вестерн, фантастика, фэнтези, приключения, комедия и другое. Позвольте себе расслабиться и на время отвлечься от повседневных забот. https://epicserialls.online – ресурс с понятным интерфейсом, который необходимый сериал дает возможность быстро отыскать. Мы гарантируем широкий выбор контента. О вашем комфортном просмотре мы заботимся. Всегда вам рады!
игровой клуб Лев
1 year agoКазино Лев — место, где можно выиграть и расслабиться!
игровой клуб Лев
Jiyibcit
1 year agoИщете проектирование, поставку, монтаж и настройку цифровых решений для своего бизнеса? Посетите сайт Глобэкс Групп – это системный интегратор и официальный дистрибьютор мировых брендов. Мы предлагаем комплексный подход для решения корпоративных задач для клиентов в IT инфраструктуре по низким ценам. Подробнее на сайте https://global7.ru/
Albert Valiakhmetov
1 year agoFlyX unlocks the blueprint for influence in an age of content saturation.
Albert Valiakhmetov
Albert Valiakhmetov
1 year agoWhether in politics or marketing, the message is everything—FlyX perfects
the delivery.
Albert Valiakhmetov
SefefKix
1 year agoFind out all about Betandreas casino in Bangladesh on the website https://betandreas-official.com/ – this is a huge list of benefits from a significant welcome bonus and various promotions. Find out on the official website how to start playing, how to register, how to bet on sports and eSports, as well as a guide to playing casino slot machines.
show more show lessjuyivCoity
1 year agohttps://arayas-cheats.com/ – это огромный выбор приватных читов для топовых игр, включая Escape From Tarkov, Rust, War Thunder и другие. Мы предлагаем надежные и безопасные читы, обновляем ассортимент, обеспечиваем конфиденциальность. Ваше преимущество в игровом мире – наша цель. Перейдите в каталог – вы будет удивлены ассортименту и выгодной стоимости.
Fiwowehathe
1 year agoСамый большой выбор фурнитуры для дверей — в интернет магазине FurnituraPRO https://furniturapro.ru/ – с доставкой по Московской области, России, Казахстану и Беларуси. Посмотрите каталог с выгодными ценами и огромным ассортиментом. У нас постоянно появляются новинки, а также действуют акции. Подробнее на сайте.
jivodiLOM
1 year agoLooking for free site speed checker? Milten.io and you will have the opportunity to check the site loading speed and its performance. Use our tools for resource diagnostics, its technical analysis, and monitoring of your portal. The service specializes in analyzing and optimizing site loading speed for better ranking in search. You will be able to conduct a deep analysis of the resource and get advice on how to speed it up.
show more show lesshttps://ashwoodvalleywiki.com/index.php?title=User:ValeriaPaul029
1 year agoПрозрачные условия аренды, никаких скрытых платежей, рекомендую!
https://worldbox.wiki/w/User:RondaAzg852811
Be the first to comment